Learn how to follow a cross stitch pattern chart from where to start on your canvas to what order of stitches to complete first. If you’re looking forward to starting your first counted cross stitch project but you’re staring at the thing and don’t know where to begin, you’re in the right place!
Now I know most people can figure it out on their own, so this is meant to not only show you what to do, but to also give you a little boost of confidence that you were probably on the right track all along.
Remember: It’s YOUR art. Do what you want!
Only read on if you’d like to skip all the noob mistakes. 😉
Watch this video to review the parts of a cross stitch pattern chart and read on for more detail.
The First Thing to Do With a Cross Stitch Pattern
Read the whole damn pattern. Yeah, I’m not kidding.
The very first thing you should do is look over the whole thing and make sure you know what all of the little symbols and lines and instructions mean.
Learn more about how to read a counted cross stitch pattern.
Do you have all the supplies you need? It can be SO disappointing to get into your stitch groove and realize you’re missing a color.
Click here to learn more about cross stitch supplies for beginners.
Oh no! ANOTHER trip to the craft store. (There’s never just 1 trip to the craft store, am I right?)
How to Start a Cross Stitch Pattern
For smaller projects, it’s best to start at the center of the pattern.
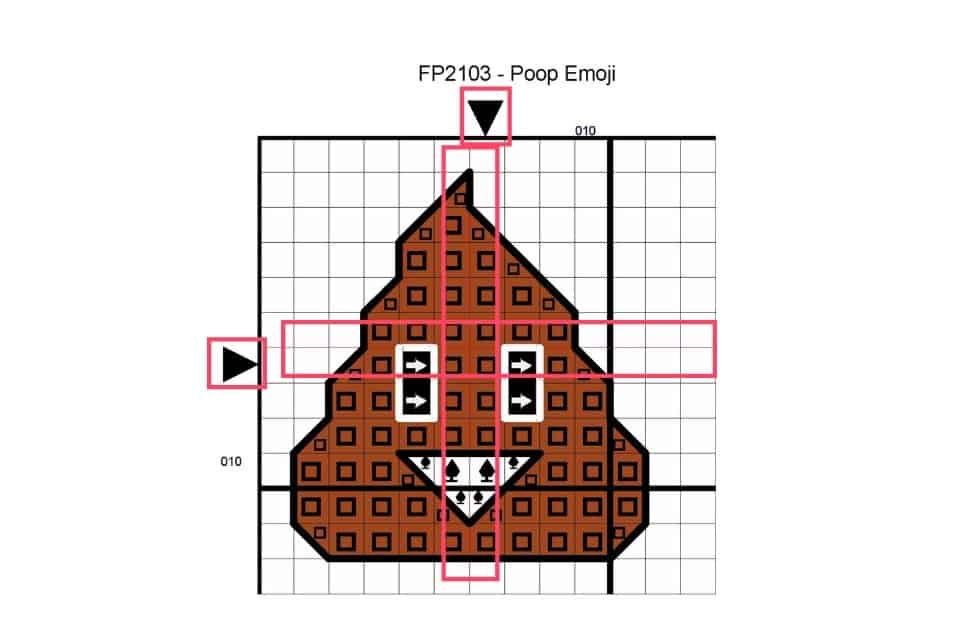
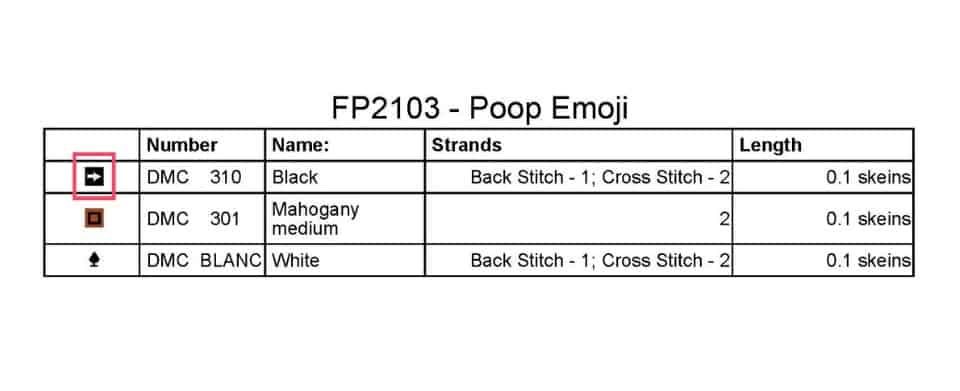
You can find the center of the pattern on the pattern chart by looking for the colored grid lines – usually red or blue. Where they cross represents the center stitch. In black and white patterns, look for arrows in the shape of little triangles at the top and left of the chart that point to gridlines. Where those gridlines cross is the center stitch.
Finding the center of your fabric is easy. Fold in half, rotate 90 degrees, and fold in half again. Unfold the entire piece of fabric, and where the folds cross is the center of the fabric.
For large, full coverage patterns (usually more than 9 pages), I recommend starting in the top-left corner of the pattern and on your fabric. These types of patterns are not recommended for your first cross stitch project. They take ages to finish!
The large pattern will be many, many pages and for patterns in English, the top-left page is Page 1. Start your stitches at least 3 inches away from the edge of your fabric to leave enough room for framing.
Larger projects may require even more blank fabric for framing, and you should check the pattern instructions for more info. (See? This is why you read the whole thing first. :-P)
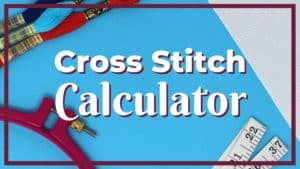
Use the Cross Stitch Calculator to help you determine how much fabric you need.
The Order of Stitches
If your project has more than whole cross stitches and fractional stitches, it’s best to stitch in this order:
- Cross Stitch / Fractional Stitch (learn about fractional stitches)
- Back Stitch (learn how to back stitch)
- Embellishments (beads, buttons, ribbons, etc)
By doing all the cross stitch before the back stitch, the back stitch will be placed on top and can be seen. If you back stitch first, the cross stitches may cover the back stitches and change how the finished project looks.
The beads and other embellishments are done last. If you try to cross stitch or back stitch after beading, the floss gets all tangled up in the beads and is a general pain in the ass!
Next Follow the Symbols
Each symbol represents a color in the floss color key included in your chart. You can make all the stitches in a row or a column, or stitch them one at a time – however you want.
Count carefully and before long you’ll see your pattern take shape. Then, count again. The important part is that the stitches on your fabric match the pattern of squares on the chart grid.
It can help to mark off each stitch or each row or column as you go to help keep your place. Make a “working copy” first so you can keep the original pattern and stitch it up more than once!
Designer's Notes
Somewhere in the pattern, there may be a short paragraph about the details of parts of the pattern. These are the designer’s or publisher’s notes, and are often full of hidden gems.
(Another reason to read the whole pattern first!)
Cross stitch software is getting better and easier to use, but it can’t always keep up with the creative juices flowing in a designer’s brain. For instance, there is no software that can help design 3D cross stitch – yet!
Pattern makers must improvise and this is where they leave the special instructions that are unique to that pattern.